Ryan Scott Brown
I build cloud-based systems for startups and enterprises. My background in operations gives me a unique focus on writing observable, reliable software and automating maintenance work.
I love learning and teaching about Amazon Web Services, automation tools such as Ansible, and the serverless ecosystem. I most often write code in Python, TypeScript, and Rust.
B.S. Applied Networking and Systems Administration, minor in Software Engineering from Rochester Institute of Technology.
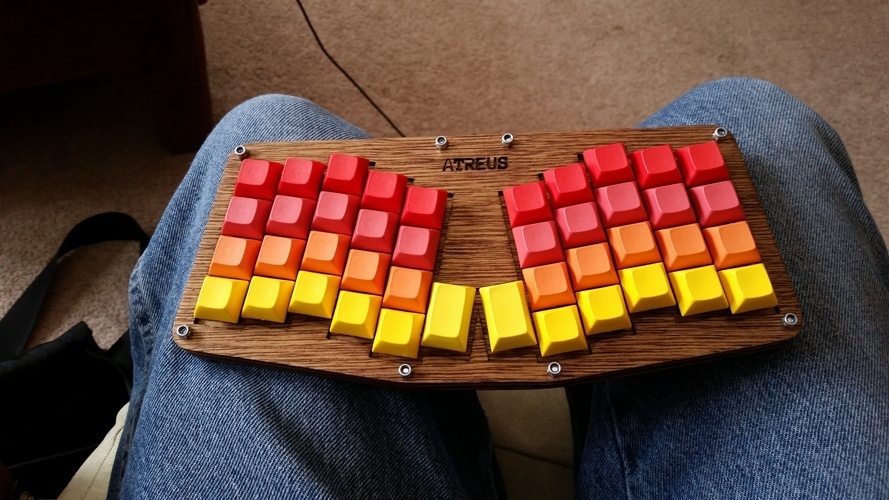
Atreus: Sunrise Edition
Since college I’ve been interested in building better ways to type, and this weekend I took some time to build (yet another) keyboard. This one is the Atreus, a small ortholinear keyboard kit.
I’m not a big fan of the default Matias switches. I got an Infinity Keyboard from Massdrop and the attachment for the keycaps made it feel like I was at risk of snapping the PCB while putting them on, and I actually did break one switch while removing a keycap. The stem of the switches also have a lot of wobble when typing, so the board doesn’t feel as solid as my Ergodox, which uses Cherry switches. It’s also much harder to find keycaps with fun colors for Matias switches since they’re so much less common.
Cherry clears are my switches of choice, since they’re relatively quiet, but the heavy springs make them really tactile and harder to bottom them out entirely.
I’ll spare you the instructions, since Phil includes these instructions that cover everything you’ll encounter in the build process.

Parts List
To build your own sunrise-themed version of the Atreus, here’s what you’ll need.
- Atreus kit from Phil’s site without keycaps or switches
- 50 Cherry MX clear switches from mechanicalkeyboards.com
- 4x 1.5 space yellow DSA keycaps (color code YAM)
- 10x 1 space DSA red keycaps (RBH)
- 10x 1 space DSA pinkish keycaps (RCF)
- 10x 1 space DSA orange keycaps (OAZ)
- 10x 1 space DSA yellow keycaps (YR)
For the wood case, you can choose to stain it (I did) or just use the finishing wax that comes with the kit. To handle the wood finishing, I needed:
- 2x old rags
- 200, 450, and 1000+ grit sandpaper
- Small can of stain/varnish mix, Dark Walnut color
- A workbench
- Vacuum for sawdust